SSL Installation on Microsoft IIS 5 and 6
Installing an SSL Certificate on a Microsoft Internet Information Server 5 and 6
If you have control on the process of requesting CSR and acquisition certificates, skip directly to step 3: Certificate Installation
When acquiring the certificate you have two options: Create your own certificate request (CSR), or let us do it for you.
If you decide that we are the ones who do it for you, skip step 1.
Step 1. Create a CSR certificate request
The first thing you must do is to create a certificate request. To do this follow these steps:
- Click Start, select Programs Administrative Tools->, and then click Internet Services Manager in Internet Information Services (IIS) Manager.
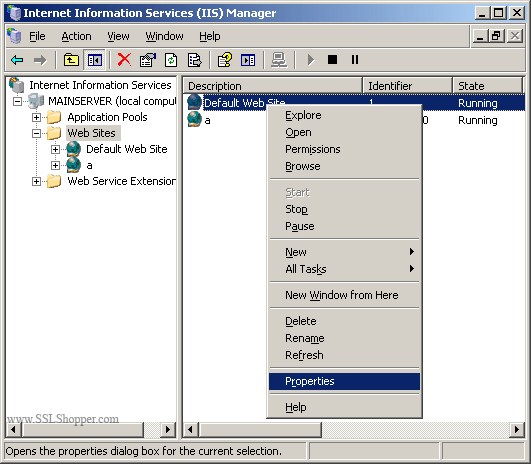
- Double click on the name of the server so that you can see all the Web sites. In IIS 6.0, you have to expand Web sites.
- Click with the right button of the mouse on the Web site in which you want to install the certificate, and then click Properties.

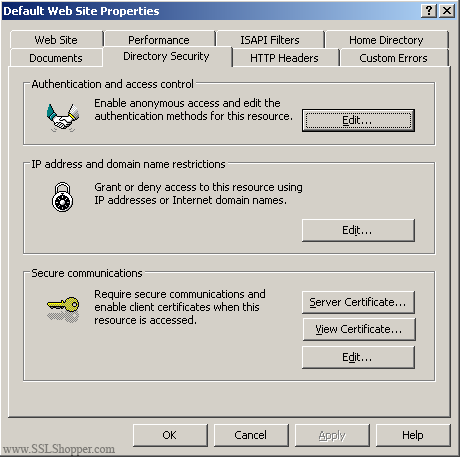
- Click on the Directory Security tab, and then click server certificate on the secure communications to start the Web Server Certificate Wizard. In IIS 6.0, click Next.

- Select create a new certificate and click Next.
- Select prepare the request now but send it later and click Next.
- Type a name for the certificate. The simplest is that you use the name of the web site to name the certificate, but you can choose which you want. Then, select a length in bits; The higher the bit length, the greater the encryption certificate.
- Type the organization name and the organizational unit (for example, MiWeb and Development Department). Click on next.
- Type the domain (if necessary FQDN (*)) and click on next.
- Enter your city, province and country and click on next.
- Type the path and file name to save the certificate information and click next to continue.
- Check the information you have written, and then click next to complete the process and create the certificate request.
(*) Significa que si quieres que el certificado cubra tanto al dominio con las www como sin ellas, tendrás que escribirlo con el formato wwww.dominio.com
Step 2. Purchase and download your certificate
Elige aquí el certificado que más se ajusta a tus necesidades.
If you come from step 1, you must you have on hand (CSR) certificate request file and open it with a text editor to copy it when we ask you. Otherwise, if you decide that we believe CSR certificate you request, you must provide us with data that allow us to do so. Please fill in all the information that you request.
Una vez que haya acabado el proceso de validación, te enviaremos un email con todos los ficheros que necesitas para instalar tu certificado. En caso de que hayas decidido que seamos nosotros los que creemos el CSR, te enviaremos la clave privada y un fichero PFX.
Step 3. Install the certificate
To install the certificate, if you've created the CSR from IIS, follow these steps:
- Open Internet Services Manager and expand the server name so that you can see the Web sites.
- Click with the right button on the desired web site, and click Properties.

- Click the Directory Security tab. In secure communications, click server certificate. This starts the certificate installation wizard. Click next to continue.
- Select process the pending request and install the certificate and click Next
- Look for your master's certificate (*) between the files that you have downloaded your certificate and click Next. The wizard will display a summary of the certificate. Checks that the information is correct and click next to continue.
- Click Finish to complete the process.
If we have generated the CSR, just open the PFX file that we have sent to you, and follow the steps that the assistant asks you to do. And you can jump directly to step 5, since the PFX has the intermediate certificates included.
(*) Tal y como explicamos en la sección "Instalar SSL", nos referimos al fichero del Certificado Principal.
Step 4. Configure the intermediate certificates
1. Open the Microsoft Management Console (MMC) snap-in.
- At the command prompt, type Mmc.exe.
- If you are not running the program as built-in Administrator, ask you permission to run the program. In the Windows Security dialog box, click allow.
- On the file menu, click Add / Remove snap.
- In the dialog box add or remove snap-ins, click the Certificates snap-in the available add-ins list, click Add, and then click OK.
- If a warning dialog opens, click
- The Select Color dialog
- In the dialog box add or remove snap-ins, click OK.
To do this, complete the following steps.
- In the add certificates MMC, expand certificates, click intermediate certification authorities, select all tasks, and then click Import.
- Click Next, and then complete the Certificate Import Wizard.

- On the file to import page, enter the name of the certificate file that you want to import into the picture file name, and then click Next.
- Click Next, and then complete the Certificate Import Wizard.
No longer necessary to set and try the bight.
- On the Security tab of directories, in secure communications, you'll see that there are now three options available. To allow the Web site to require secure connections, click Edit. The secure communications dialog box appears.
- Select require secure channel (SSL) and click OK.
- Click apply, and then click OK to close the property sheet.
- Go to the site and check that it works. To do this follow these steps:
-
- Access it using HTTP. Put in a browser "http://localhost/". You should receive a message saying "HTTP 403.4 - Forbidden: SSL required.".
- Access to the website through a secure connection (HTTPS) typing https://localhost/ in the browser. If the page is displayed, it means that you have successfully installed the certificate.
[Fuentes: Guía oficial de Microsoft de instalación SSL y Guía oficial de Microsoft de instalación de certificados intermedios.]
Big Saves
